This article about the John Muir Trail was brought to you by Morsel Spork, the makers of the best spork for all of your delicious backcountry meals. Whether you’re on a 20-mile or 2,000-mile trail, this spork is sturdy, reliable and lightweight for all adventures.
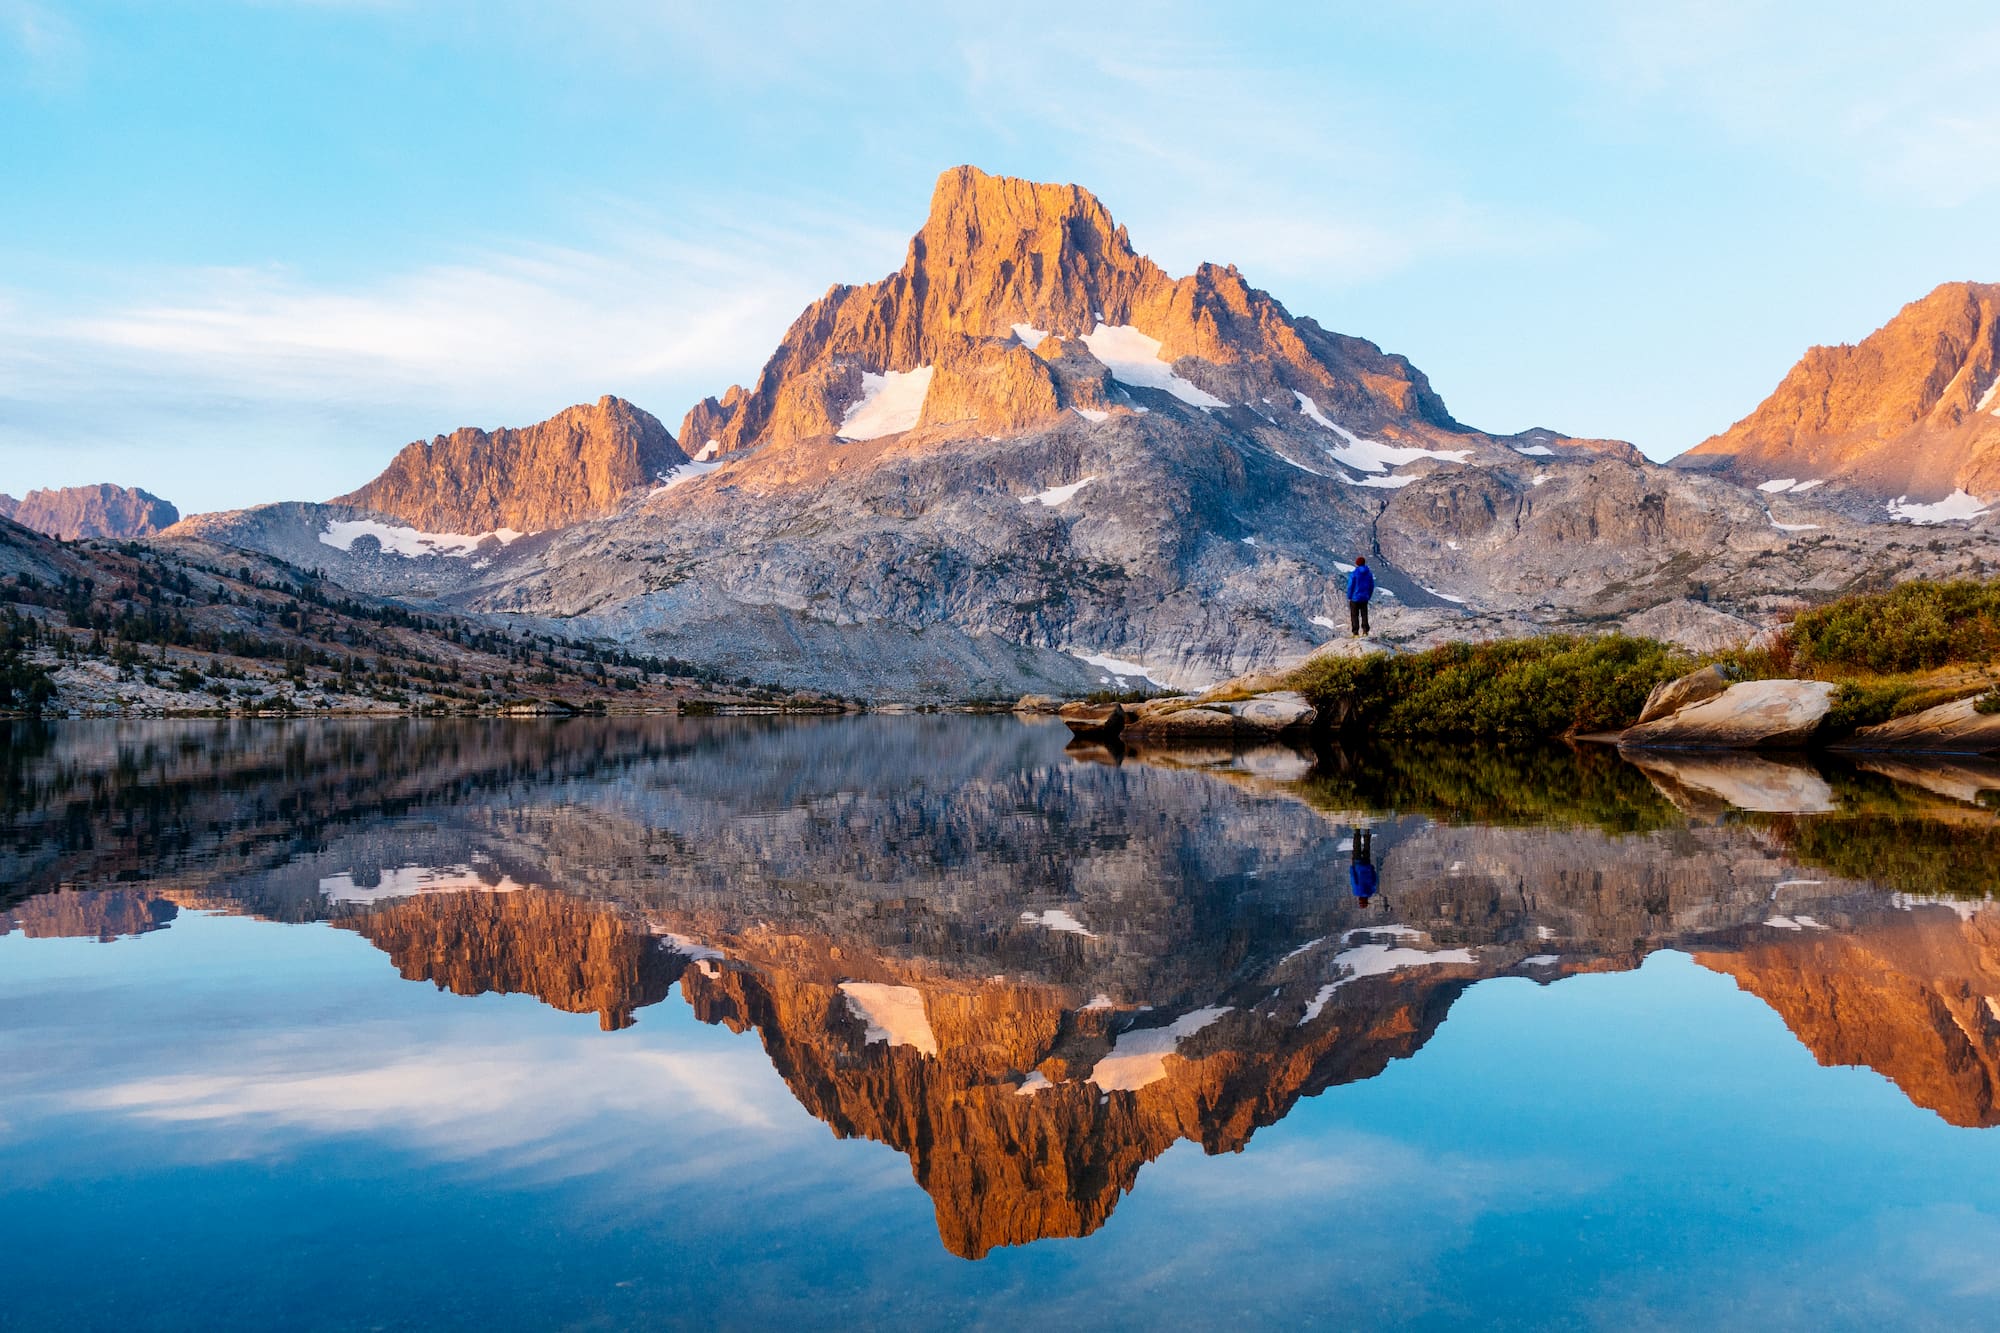
On a midsummer day in 2017, I had a sudden stroke of inspiration — I wanted to backpack the John Muir Trail. For the uninitiated, the John Muir Trail winds 211 miles from Yosemite Valley to the summit of Mount Whitney in the High Sierra backcountry — some of California’s most scenic regions. It is famous for unparalleled beauty and is at the top of countless backpackers’ bucket lists. Hiking the JMT means traveling up seven mountain passes and 46,000 feet of elevation gain along the way.
I was up for the challenge, and I wanted to do it alone to reflect on my recent college graduation and ultimately see if I was capable of hiking it solo. After some three minutes of research, however, I read that 97% of all JMT thru-hike permit applications are denied. Hikers are supposed to apply half a year in advance and even then, there’s no guarantee of getting a permit. Instant disappointment.
Reading further, hope was restored. Yosemite National Park reserves 10 permits each day on a first-come, first served basis. I decided to take a risk, head to the Yosemite Valley and try my luck at scoring a southbound permit.
The Amtrak bus pulled into the valley on a warm August evening and greeted me with the happy faces of climbers and backpackers laughing and stoking their fires to wind down for the night. The smell of redwoods and pines filled the air while the infamous Half Dome and El Capitan towered above. Camp 4 buzzed with life and excited chatter about hikes amongst glaciated peaks and roaring waterfalls. I made dinner, drank some beer and chatted with friendly Camp 4 folk, anxiously anticipating my own fate.
As dawn broke, I hastily packed my gear and dashed to the Ranger Station. To my dismay, the National Park System changed their policy that year and no longer distributed permits from Happy Isles. The ranger told me to come back at 10 a.m. and try my luck at procuring a cancelation permit. The clock ticked by at a glacial pace as I drank coffee and checked my watch incessantly. At 9:59am, I beelined to the ranger station with my heart in my throat. “You’re in luck. There are four cancellations for today, would you like a permit for Half Dome, too?”.
Photo by Emily Gallegos
I bolted outside and re-packed my backpack at lightning speed. The aftermath of that lucky permit became a soul-filling, stunningly beautiful, empowering journey that I would do a million times over.
In three weeks, my trusty feet carried me past countless shimmering lakes and rivers, sweeping views from 13,000 and 14,000-foot mountain passes and fields dotted with colorful wildflowers.
In addition to the stunning scenery, the John Muir Trail brought me countless moments of unexpected fortune. The Summit of Half Dome at dusk greeted me with unheard-of solitude and a pink and purple sunset against the massive glacial rocks. I responded by getting naked and singing my favorite songs aloud. The trail also reminded me of how good people can be. I won’t forget the guy who gave me adhesive to fix the hole in my sleeping pad or the woman who gave me a ride and some weed in Mammoth Lakes. Swimming in frigid alpine lakes reminded me how fun life should be.
My journey, ended at the summit of Mt. Whitney, the tallest mountain in the contiguous U.S and the southern terminus of the John Muir Trail. The sunset lit up hundreds of peaks behind me with golden light, as tears filled my eyes because I’d fulfilled one of my many whimsical little dreams. The storm shelter at the summit, sitting at 14,505 feet, was what I called home for the night. After a frigid night, the sun rose, prompting me and my trail friends to smoke a joint and drink hot cocoa. The brutal 99 switchbacks and 6,000 feet of elevation loss to the Whitney Portal kept me humble. My dad met me at the bottom with applause and tears in his eyes.
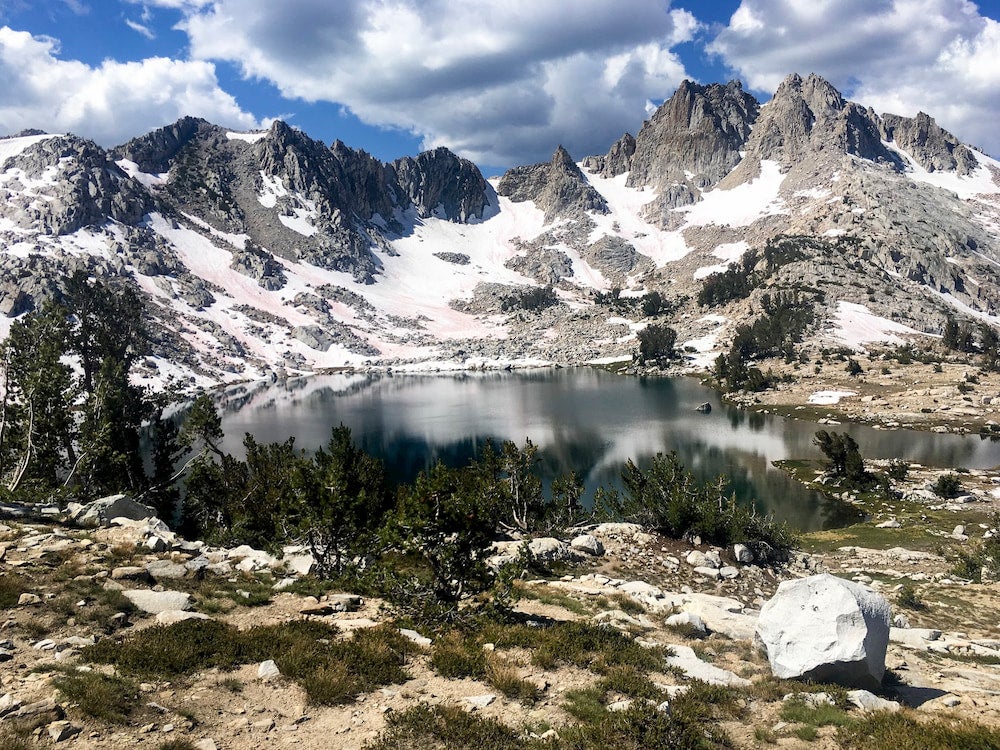
Photo by Emily Gallegos
After completing something so meaningful, I highly recommend discovering The John Muir Trail for yourself. However, not everyone’s experience will turn out quite like mine — I was privileged to take time post-college to hike it, and lucky to get a permit at all. Most people need a little more planning to make this trek happen, so below you will find an all-inclusive guide to the John Muir Trail.
Your Guide To California’s John Muir Trail
If you are willing to take the risk for a walk-up permit or cancellation permit, I won’t discourage you. But if you want to be more diligent about your planning, we’ve created an all-inclusive guide for your unforgettable thru-hike.
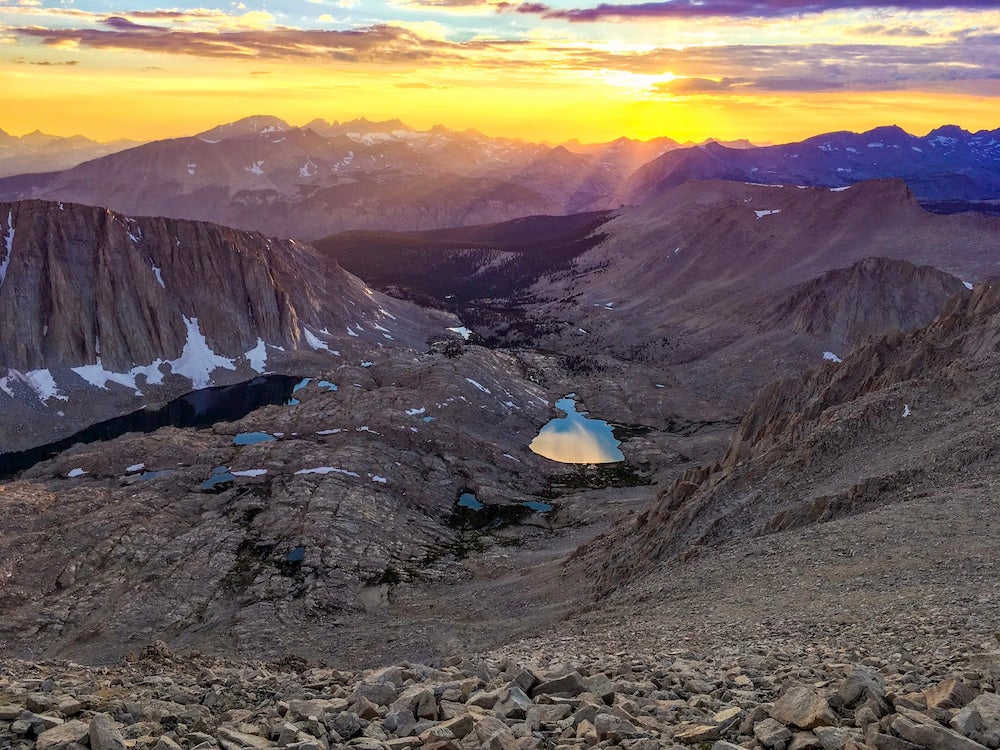
Photo by Emily Gallegos
A Brief History of the John Muir Trail
The John Muir Trail was the brainchild of Theordore Solomons, an explorer and early member of the Sierra Club. He is referred to as the “father of the John Muir Trail”. One of his famous quotes reflecting on The John Muir Trail is that “the idea of a crest-parallel trail came to me one day while herding my uncle’s cattle in an immense unfenced alfalfa field near Fresno. It was 1884 and I was 14.” Solomons had done a great deal of exploring in the Evolution Basin area of the High Sierra and had grown fond of this backcountry.
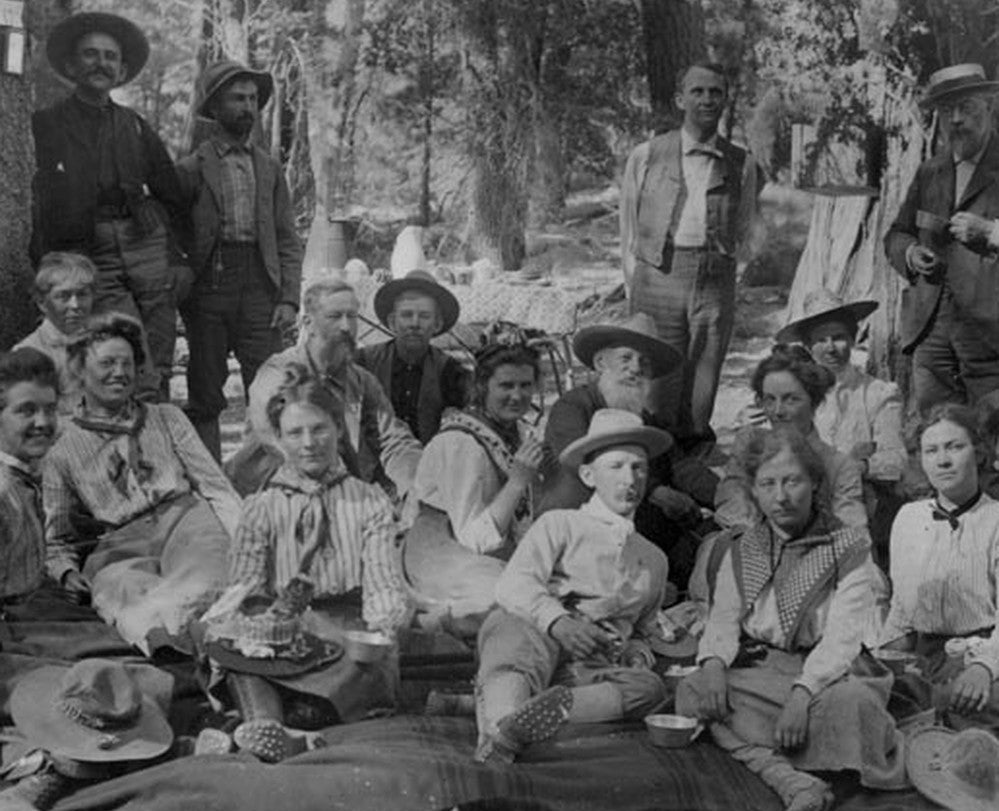
At age 22, he began advocating to the Sierra Club for the construction of a trail. At that time, John Muir was the president of the Sierra Club and already famous for being a naturalist and conservationist. Solomon and fellow Sierra Club members Joseph LeConte, James hutchinson and Duncan McDuffle began pioneering a high mountain route from Yosemite National Park to Kings Canyon. The men completed a 228-mile trip that roughly followed the modern route of the John Muir Trail. In 1914, the Sierra Club commissioned a committee to work with the State of California to construct the trail. That same year, John Muri passed away. The Sierra Club name the trail after him to honor his dedication to the wilderness areas of throughout the U.S.
Construction of the John Muir Trail began in 1915. The California Legislator allotted $10,000 for the construction of the trail that year. Additional appropriations of $10,000 came in the years 1917, 1925, 1927, and 1929. The Great Depression prevented further state investment into the trail. So the Sierra Club turned to the Forest Service and the National Park Service for assistance. The trail was finally completed in 1938. It was a 46-year project.
John Muir was an activist and environmentalist who dedicated his life to protecting the wilderness areas of the U.S. He played an instrumental role in the development of the national park system and the battle to preserve some of the United State’s most beautiful natural areas. He was the driving force to the instatement of Yosemite National Park in 1892. William Edward Colby, the first secretary of the Sierra Club, referred to the trail as “a most appropriate memorial to John Muir, who spent many of the best years of his life exploring the region which it will make accessible.”
John Muir Trail Overview
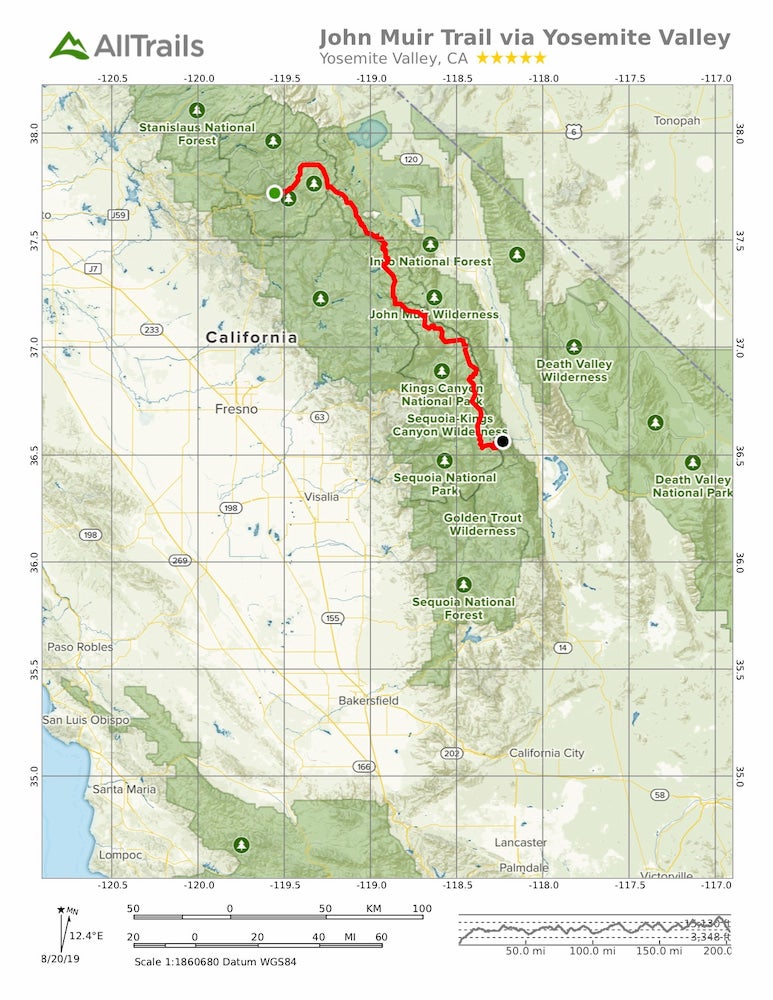
Photo from AllTrails
Trail Length: 210 miles from Happy Isles to Mount Whitney Summit (southbound). 221 miles including the hike to Mount Whitney Portal.
When To Go: June – early October.
Days to Complete The Trail: Anywhere from 10 to 30 days depending on your fitness level. I completed it in 21 days with two “zero days”. This was a happy pace for me.
Elevation Gain and Loss: 46,700 ft. of gain (1.5x the height of Mt. Everest) 38,000 ft of Loss (Southbound).
Elevation High and Low: High: Mount Whitney – 14,505ft. Low: Yosemite Valley – 4,000 ft.
Best Time To Go
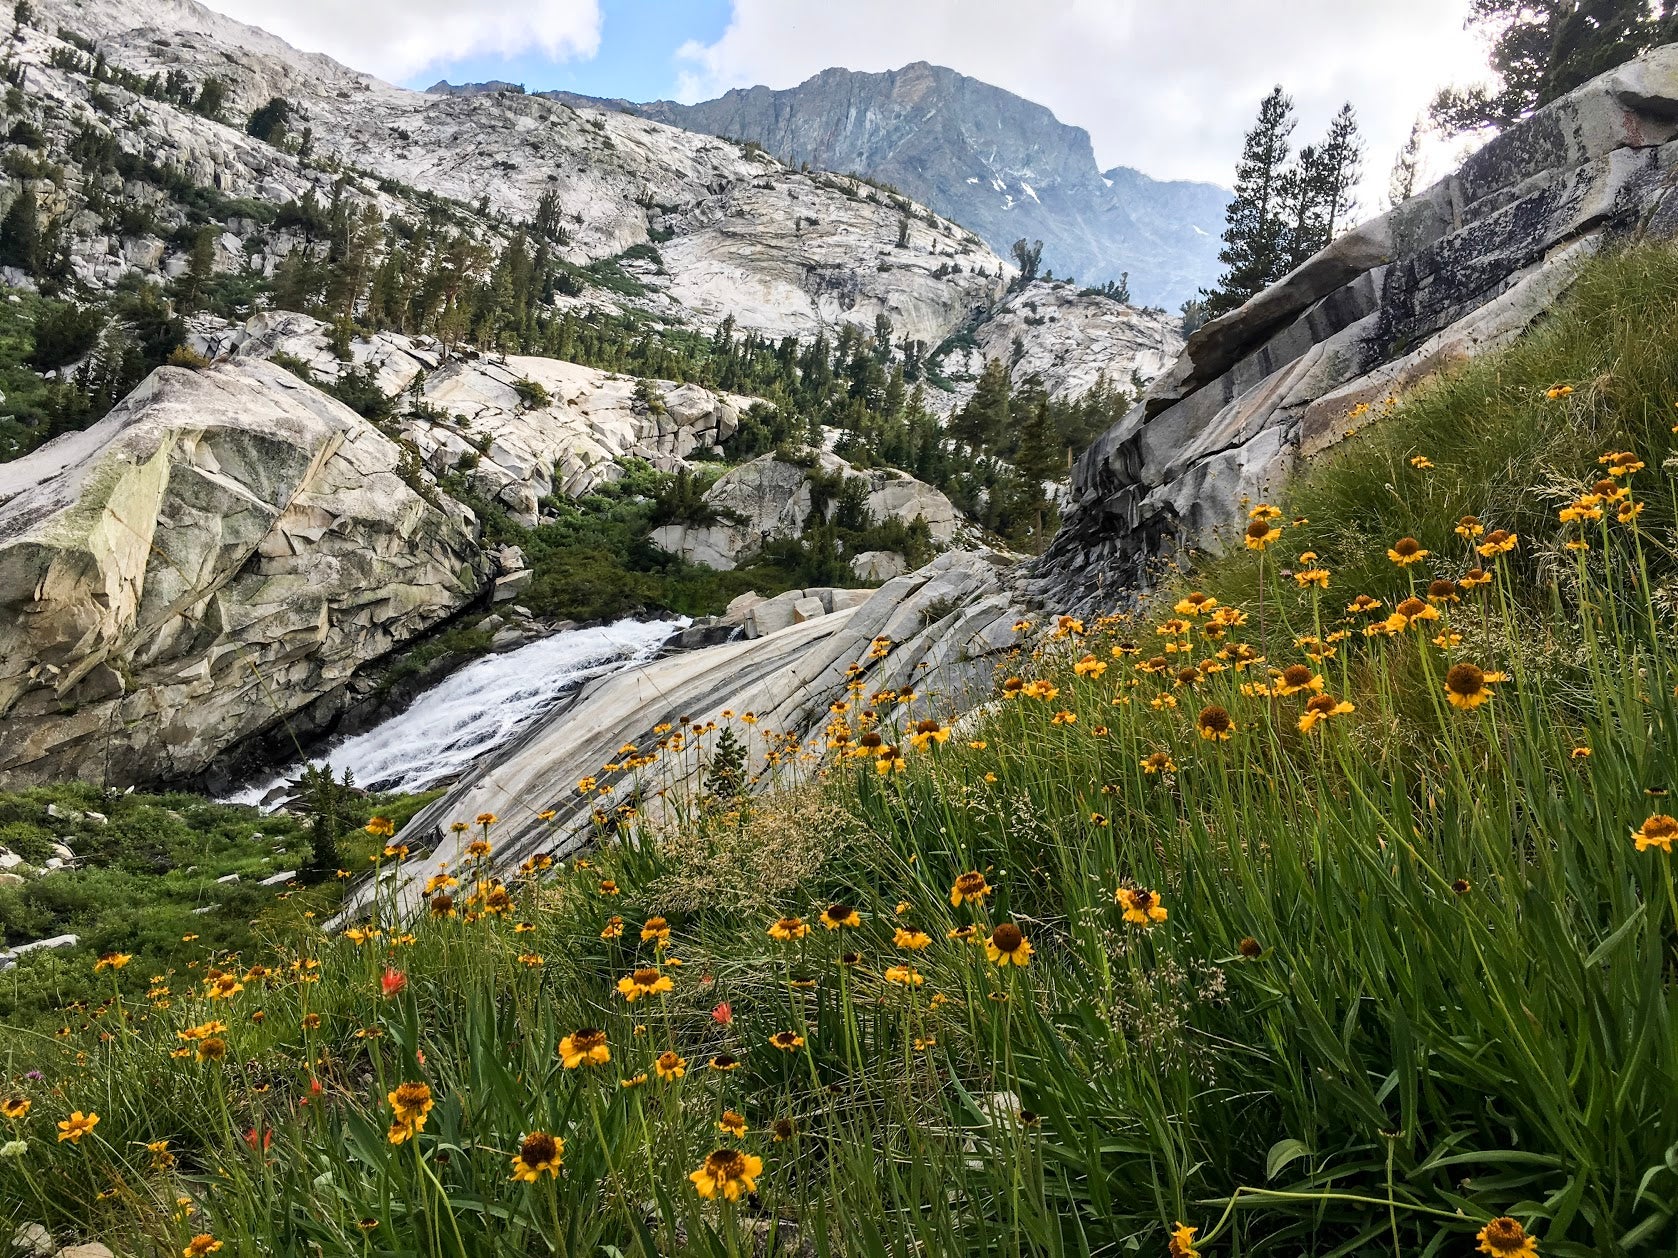
Photo by Emily Gallegos
The John Muir Trail is hikeable any time from mid-June to early October, but the conditions vary by year, based on snowfall and river levels. Each month has its pros and cons, so apply for your permit based on your needs and ability.
June: June is less crowded, but you might run into snowfields and snow passes that can be tricky to navigate and sometimes dangerous. You may need crampons and an ice ax.
July: July can have dangerous river crossing because of snowmelt, but typically glorious weather and minimal bugs.
August: August has near-perfect weather, but the flies and mosquitoes can be ruthless. I hiked the JMT in August and had fantastic weather, and the river crossings were safe.
September & October: By mid-September, the days are shorter and the nights are colder, but there is typically reliable weather and fewer people on the trail. It can be difficult to plan resupplies in late season due to some resupply depots closing in late September.
Northbound or Southbound?
You decided to do the John Muir Trail. Great! Time to decide which direction you want to go.
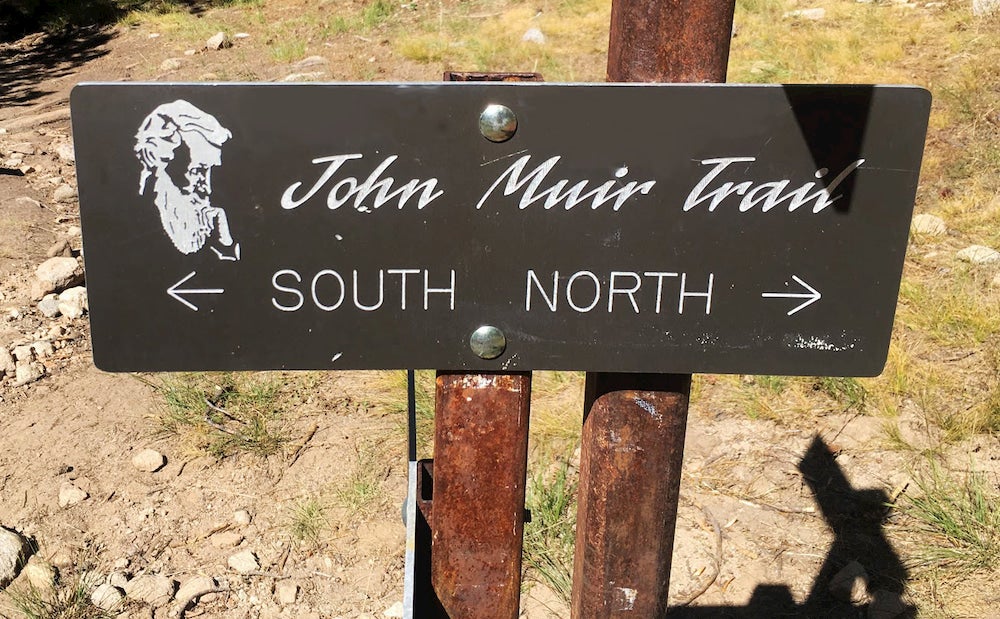
Photo by Emily Gallegos
South Bound:
Pros:
- More time to adjust to the increased altitude and more challenging terrain leading to Mt. Whitney.
- Ending the trail at Mt. Whitney (Tallest peak in the contiguous U.S.) is pretty epic.
- Chance to meet friendly PCT hikers going North (this may be a con for you)
Cons:
- Hefy climb from Happy Isles to Little Yosemite Campground
North Bound:
Pros:
- Sun is at your back during the afternoon
- Traditional route done by Sierra Club member who helped establish the trail
- Less JMT hiker head in this direction, which may give you more solitude or learn more about what is ahead of you on the trail from south-bound hikers.
Cons:
- Difficult to get a permit
- Difficult beginning to the trail as hikers have to make the difficult climb up Mt. Whitney to begin the trail (6,000 feet).
Permits
Southbound:
By now it’s probably evident that acquiring permits to do the John Muir Trail is difficult. The southbound permit is one of the most competitive hiking permits in U.S., along with The Wave in Arizona and the Core Zone of the Enchantments in Washington. This strict permit system was created to reduce the environmental impact in the Sierra Nevada. In 2015, data showed that there was a 165% increase in overall permit requests as year to date. This has prompted an exit quota of 45 hikers per day exiting Donahue Pass southbound out of Yosemite Valley.
Although this permit system is competitive and can be difficult to navigate, we’ve got you covered with basic info. Just remember the beauty of the trail is extremely worth chancing your luck.
When to Apply
To apply, head to the Yosemite Conservancy website. This is an online application. Thankfully, the faxing days are done.
When you apply, submit your start dates with up to a 21-day range of possible start dates, starting trailhead, the first nights camping site, group size, end date and ending trailhead. You should apply for your permit 24 weeks (168 days) before your desired start date. However, you can submit applications up to 170 days in advance, so take advantage of the early start.
You’ll then receive daily emails informing you if you’ve been accepted or denied a permit for the 21 day range you submitted. If you are denied for your first desired date, the lottery will roll over to the next day, and so on until the 21-day range expires. If you are denied for all 21 days, you can apply for another 21-day range once again.
Possible Starting Trailheads:
- Happy Isles
- Sunrise Lakes
- Glacier Point
- Lyell Canyon
Permit Breakdown in Numbers:
- Happy Isles, Sunrise lakes, Glacier Point trailheads: 20 permits / day by reservation.
- Lyell Canyon: 25 permits / day (15 by reservation, 10 by walk-up).
Requests are accepted from February 1 to March 15 for beginning dates in July-Sept. These dates fill up entirely in the advance lottery. Any remaining permits will be available on April 1. There is a group size limit of 15 people.
There is a $5 processing fee and a $5 transaction fee. If you are allotted a permit, you have 14 days to pay before the reservation is cancelled. There is no charge if your permit is denied.
If you are granted a permit, first, congrats and woohoo! Then, you’ll have to pick up your permit in person at one of the five wilderness centers in Yosemite. You must start your hike on the date specified on your permit.
Northbound Permits
Most people choose to hike the John Muir Trail southbound, as it was the original direction walked by Sierra Club members Theodore Solomons, James S. Hutchinson and Duncan McDuffie, who dedicated the trail to John Muir. However, there are plenty of benefits to hiking northbound. This direction means an intense climb up Mt. Whitney from the Whitney Portal, but gorgeous views from the get go and gradually declining elevations.
Just like southbound permits, the northbound permit from the Whitney Portal to the summit of Mt. Whitney is based off of a lottery system and is very competitive. You can apply for it on the recreation.gov website.
When applying, submit your application from February 1 to March 15. Typically around March 15, the lottery system on Rec.gov announces permit results on your online profile. If there are any remaining permits, they become available on April 1. You must accept your permit by April 30 or you will lose it. On May 1, unclaimed permits are released at random. This is not likely.
First come, first served permits
If you are denied a permit in the advanced lottery, you may still be able to get a permit via 10 first come first serve allotted from Lyell Canyon each day. It is no longer possible to get a first come first serve permit from Happy Isles, Glacier Point and Sunrise Lakes trailheads. The best option for a walk up permit is at the Lyell Canyon Trailhead. They are available at 10am and competition is fierce.
If you are gung ho about doing the classic route from Happy Isles to the Whitney Portal, but were denied an advanced lottery permit, it’s possible to get a walk up permit from Happy Isles to Lyell Canyon, and then you’ll have to get a first come first serve permit for the rest of the trail.
There is also a slight chance of getting a cancellation permit for the entire trail, but that’s if you’re really lucky. This was my case, but 2017 was a 200% snow year and which amounted to uncrossable passes in June and deathly river crossings in July. This may have deterred people.
If you have some flexibility and patience, there are a few ways to obtain the highly sought after permits.
Food Planning
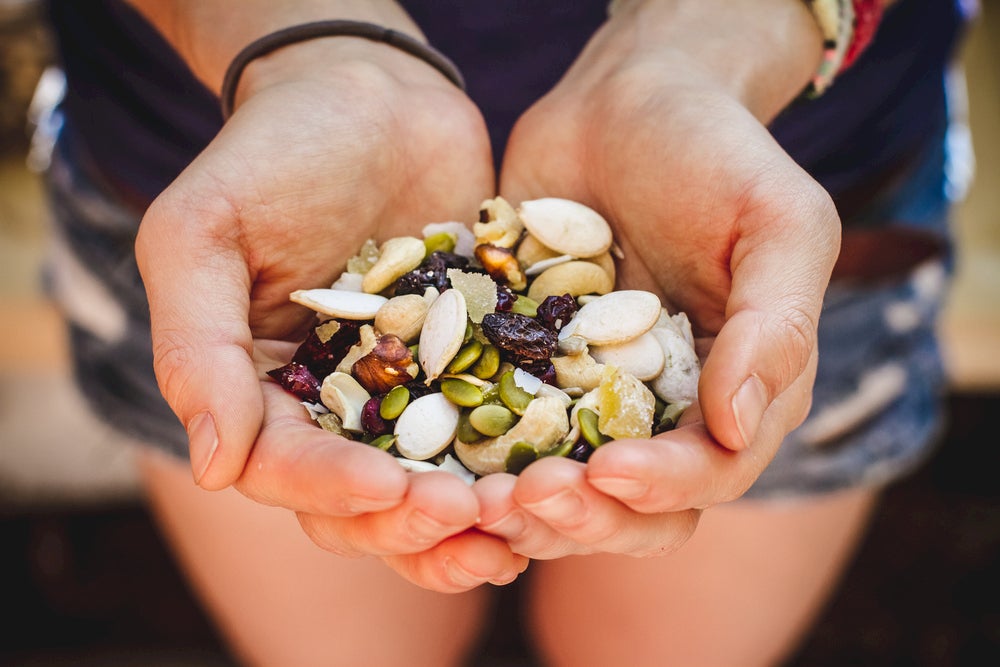
You have your permit! Woohoo! Time for food planning. Hiking in the High Sierra is hard work, so you need to make sure you keep up with all the calories you’ll be burning. It’s a tough hike, so you should make sure you’re sustaining your energy, health and happiness.
Food for thought:
- Bring lightweight food
- Put food in plastic bags to reduce bulkiness of food and minimize trash
- Bring breakfasts, lunches, dinners, & snacks
- Be sure to bring calorically dense foods like nuts, nut butter, olive oil, and energy bars. You can even calculate how many calories you’ll be burning.
- Bring a variety of foods that you enjoy.
- Calculate how many days you’ll be on the trail plan accordingly. Remember to factor in 0 days
Overpacking food for the John Muir Trail is a classic hiker’s trope. At resupply stations, there is always a plethora of leftover food from hikers who couldn’t fit all of their peanut butter or dried meals into their bear canister. Overpacking also leads to discomfort on the trail as well because heavy food equals a heavy backpack. That all being said, it’s important to pack lightweight, but calorically dense foods that aren’t too bulky. Depending how you plan your resupplies, you’ll be carrying 5-10 days of food. Remember there’s always a way to make backpacking food taste better.
Food Prep Steps
- Grocery shop for breakfasts, lunches, dinners and snacks. (Use our meal ideas below for reference)
- Lay out your meals in a room to seem them visually. Put them in piles based on the breakfasts, lunches, dinners and snacks for the number of days in between each resupply. For example, I had 3 resupplies with food for 5 days, 6 days and 10 days.
- Put them into a bear canister to see if the meals fit properly inside.
- Try your pack on to feel the weight of what you’ll be carrying.
Backcountry Kitchen
I hiked solo, so I kept my kitchen light. I used a titanium pot from Snowpeak, a Morsel spork, and an MSR pocket rocket. I used my pot for coffee and for meals, which kept things light. Primus has a plethora of backpacking stoves as well.
Resupply Locations
Your next step in the process to prepare for the John Muir Trail is to choose your resupply locations. You’ll likely be hiking for 2-3 weeks and you do not want to carry all of that food with you, so you’ll resupply along the trail. It’s common to resupply 3-4 times along the way. I resupplied twice. First at Mammoth Lakes (mile 60) and second at Vermillion Valley Resort (mile 88). I was carrying 10 days of food after my second resupply, which I would not recommend. If I were to do the trail again I would have resupplied at Muir Trail Ranch or Independence.
You’ll send your food in boxes or 5-gallon buckets to the resupply locations or to a town post office. You can also buy food in stores along the way.
These resupply locations are listed in order for a southbound hike, but can be used for northbound in reverse order.
Tuolumne Meadows Store (mile 24)
The Tuolumne Meadows Store is stocked with food, friendly folk and a small restaurant. You can send your package here or grab some food for the coming days until the next resupply. You may get to this store on your second or third day, so it may not be necessary for you to resupply here. Remember though that the climb out of Yosemite valley is brutal so keeping your back light and resupplying isn’t a bad idea. Get ready to mingle with some kooky PCT hikers headed the other direction, grab a snack or snag a hat in the store if you forgot yours. The post office is located next to the store and will hold your package.
Call the store to check hours / availability if you are hiking in a shoulder season: 209-372-8428
Write this on your resupply package:
Your Name
c/o General Delivery
Tuolumne Meadows Yosemite National Park, CA 95389
Arriving By: ETA
Red’s Meadow Resort (Mile 60)
Red’s Meadow is a great place to send your first or second resupply. For a small fee you can mail your food package to the resort, or stock up at the small store, though options are limited. You can shower here, make some friends, stay at a campsite or in a room, and enjoy the Mule House Cafe. Check out Devils Postpile, a wall of basalt columns.
Write this on your resupply package:
Your Name
c/o Red’s Meadow Resort
PO Box 365
Mammoth Lakes, CA 93546
Arriving By: ETA
Mammoth Lakes (mile 60)
Mammoth Lakes is an alternative option to Red’s Meadow. It’s a fantastic spot to take a 0 day (or two), meaning no hiking, zero miles, and embracing leisure. It is farther off the JMT – you’ll have to take a bus from Red’s Meadow Resort to Mammoth Lakes. It is a regularly running bus during peak season with lots of friendly tourists and hikers aboard. Once in Mammoth, enjoy a plethora or cafes, restaurants, and breweries. I highly recommend Mammoth Brewery. There is often live music and a great vibe. There are also red trolleys that run throughout the town that are 100% free! Though a friendly local may stop to give you a ride first. If you are looking for a cheap place to lay your head, I recommend the Davison St. Guest House, a cute a-frame hostel with friendly hikers and travelers alike.
Write this on your resupply package:
Your Name
c/o General Delivery
Mammoth Lakes, CA 93546
Vermillion Valley Resort (Mile 88)
Vermillion Valley Resort, also known affectionately as VVR, is a favorite resupply location for hikers. The staff is very welcoming to hikers, and even offers you a free beer upon arrival. Some choose to resupply at Muir Trail Ranch instead of VVR, but I highly recommend stopping at VVR for the experience.
To get to the resort, you’ll have to hike 1.5 miles off of the trail. You’ll reach the southern tip of lake Lake Edison where you’ll catch a boat shuttle that leaves once in the morning and once in the evening. Once at VVR, sip your free beer and chat with fellow hikers. Pitch a tent or reserve a room in one of the few lodges. You can shower and get a hot meal at the restaurant that has delicious food. And your resupply package will be waiting for you.
Write this on your resupply package:
Your Name
Vermillion Valley Resort
c/o Rancheria Garage
62311 Huntington Lake, CA 93634
This address is correct. UPS will say it is not, but have the UPS clerk override with this address.
Muir Trail Ranch (Mile 110)
You’ve made it halfway along the JMT at Muir Trail Ranch! They will hold your resupply for $80. Contact the ranch at howdy@muirtrailranch.com, as there’s no phone at the ranch. You’ll find a small shop, a restaurant, lodging and hot springs for soaking.
Write this on your resupply package:
Your Name
Muir Trail Ranch
PO Box 176 Lakeshore CA, 93634
Arriving By: ETA
Kearsarge Pass to Onion Valley to Independence (Mile 180)
After Muir Trail Ranch, the resupply options become much less convenient. If possible, I recommend the resupply at Muir Trail Ranch as your last resupply, especially if you can manage finishing the trail (southbound) in 6-7 days, as it is much easier than stopping in Independence.
If you’d like to resupply after Muir Trail Ranch, your best bet is to hike 14 miles (round trip) to Onion Valley, which includes hiking over a small mountain pass. Although inconvenient, the hike to Bullfrog Lake, Kearsarge Lakes and over Kearsarge pass are quite beautiful. After that, you’ll have to arrange a ride or hitchhike into Independence, a small town with some gas stations and small shops. You can have your resupply sent to the post office or to Mt. Williamson Motel and Base Camp. The Motel will hold your package for $75.
If you plan to stay in Independence before the trek up Mt. Whitney (southbound), you can purchase a motel package that offers hikers a ride to the motel from Onion Valley, a resupply package, one night of lodging, breakfast, and laundry. Contact the infamous woman and trail angel, Strider, if you are interested in arranging this resupply option. 760-878-2121. $195 for one hiker, $395 for two hikers.
If you plan to send your package to the post office in Independence, write this on your resupply package:
Your Name
c/o General Delivery
Independence Post Office
Independence, CA 935
Water
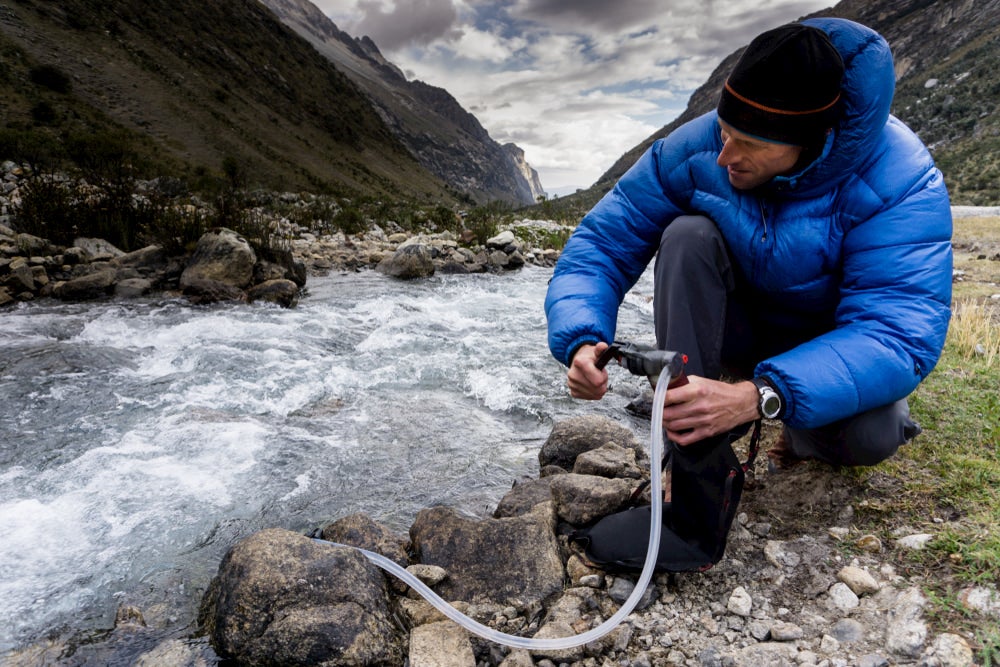
Finding water along the John Muir Trail is rarely an issue. There is a plethora of crisp water resources from snow-melted rivers and streams. Make sure to decide which water filter option works best for you. It’s always a good idea to have a back up as well, like Chlorine Dioxide Pills. You won’t need to carry more than 2 liters at a time on the trail. Make sure to stay hydrated on this hefty trail.
Although you probably won’t hike for more than 2 hours without finding a water resource, it’s a good idea to check your water resources on a map like the National Geographic JMT map. There are stretches where there won’t be water for several miles (Guitar Lake to Whitney Trail Camp), so make sure to check resources and fill up where necessary.
Bears, Bugs and River Crossings, oh my!
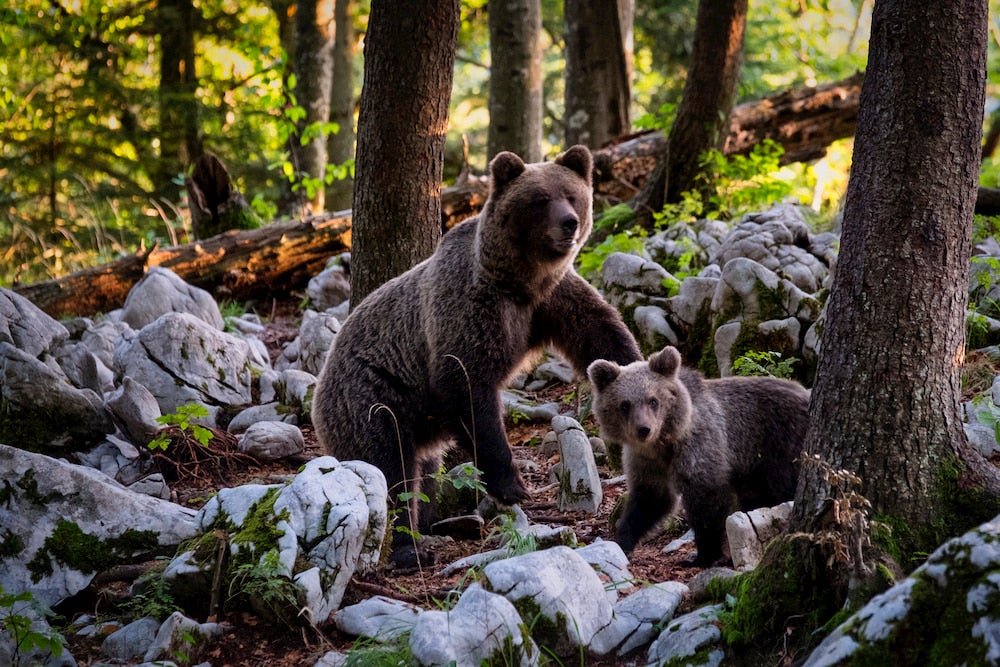
Bears:
Yosemite Valley and Kings and Sequoia National Parks are black bear country. With so many bear issues in the 70s and 80s in these areas, the parks have become increasingly strict about their bear canister policy. It is crucial for you to make sure you use proper food storage techniques. I rented a bear canister from the Yosemite Ranger Station, but you can also purchase the Bear Vault BV500 Food Container.
- Here are some tips for proper food storage:
Choose foods that are high in calories, compact, and do not have a strong odor (tortillas, jerky, nuts, pasta, peanut butter, protein bars, dried fruits) - Take food out of its original package and use plastic bags for compacting food and reducing garbage.
- Make sure your bear resistant canister is closed and locked.
- Place container 100 feet or more from your campsite.
- Do not place containers near cliffs or water sources. (Bears can knock containers down a hill)
- Do not attach a rope to a bear container as bears can carry them away this way.
- Pack out all trash and uneaten food
- Put smelly toiletries in bear containers as well.
Bugs
The bugs are vicious in late July and August. Mosquitos and black flies will follow you for miles, so keeping them at bay will make your life on the John Muir Trail much easier. If you want to go organic, try the Bugs at Bay Mosquito Spray which is deet-free insect repellent that is made in the U.S.
I am a shameless deet lover. Deet is not great for you nor for the environment. I know that, but I also know that it’s extremely effective. So, pick your poison.
Rivers
Photo by Emily Gallegos
River crossings can pose a serious threat to JMT hikers. When I hiked the John Muir Trail in 2017, California had a 200% snow year, bringing California out of a five year draught. For High Sierra folk however, this caused major problems for crossing rivers. That same year, two PCT hikers drowned in the Sierra while crossing rivers.
With that warning, be extremely cautious when crossing rivers. Do not risk your life.
- Do not cross rivers that are more than thigh deep
- Leave your boots or river shoes on while crossing
- Use trekking poles or a walking stick
- Hike up or down stream to find a safe place to cross
- Face upstream and shuffle sideways
- Unbuckle your pack
- Wear shoes that dry quickly (trail runners or chacos)
Gear List
Gear is also a very important part of embarking on the John Muir Trail. It is a challenging trail, you’ll need sturdy gear to get you through the long days. That being said, that doesn’t mean you need to break the bank to prepare for your trip. Check out our backpacking gear list. Make sure to test our your gear on other backpacking trip before you head out on the John Muir Trail.
We recommend trying to keep your base weight anywhere from 15-30 pounds. Your base weight is everything in your pack not including food and water. Some ultra-lighters have a base weight of 5-10 pounds. But this usually means they have a kid-sized sleeping pad, don’t use a stove, and a use down quilt instead of a sleeping bag.
Have Fun!
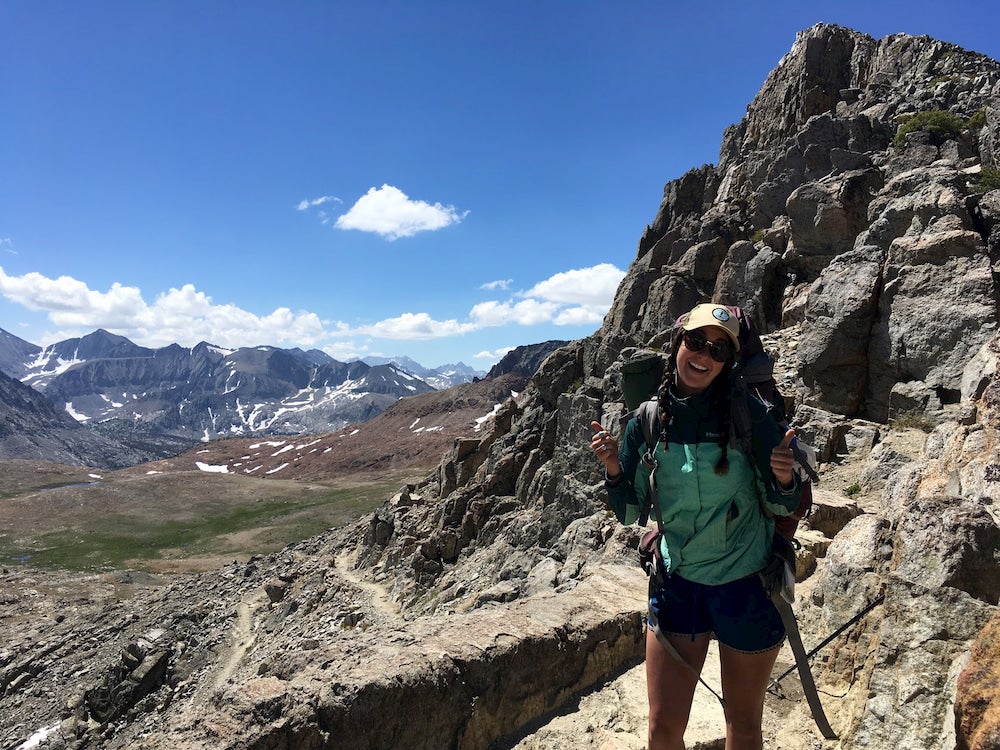
Photo by Emily Gallegos
We hope this guide finds you well and helps you plan your long and pretty walk along the John Muir Trail. It’s truly an incredible trail and is called “America’s most famous trail” for a reason. Have fun, be friendly, take good care of yourself and jump in some lakes.
This article is brought to you by Morsel Spork

Related Campgrounds:
- Kings Canyon Camping, Kings Canyon National Park, CA
- Cottonwood Pass Walk in Campground, Lone Pine, CA
- Lone Pine CA Camping, Lone Pine, CA
- Kennedy Meadows, Tulare County, CA
Popular Articles:
Articles on The Dyrt Magazine may contain links to affiliate websites. The Dyrt receives an affiliate commission for any purchases made by using such links at no additional cost to you the consumer.